
Setting Up Two-Factor Authentication in PeopleSoft (Part 1)
I am going to provide a tutorial on how to setup two-factor authentication (2FA) in PeopleSoft. This is going to serve as a technical demonstration (and documentation) of how I satisfied the project requirements that were outlined in this post. This tutorial will be split into a few parts.
Part 1 (this part) of the tutorial is to give you an overall understanding of how the 2FA process will work in your PeopleSoft environment. This part provides an overview of the necessary configuration and code changes that are needed to alter the application’s authentication process flow. Most of the information in this part of the tutorial echos what has been said in a post on Sasank’s PeopleSoft Log called Conditional Redirect in SignOn PeopleCode.
Part 2 of the tutorial provides an app designer project that you can plug-and-play into your environment to enable a proof-of-concept 2FA solution.
Part 3 of the tutorial will enhance various aspects of the project that was provided in part two.
I highly suggest reading up on a couple of items in PeopleBooks before starting this tutorial. The first item is how to configure appearance and character of the web profile . Take a good look at the Signon Result Doc Page field in this section. The second item is the SetAuthenticationResult function. Familiarize yourself with the function’s parameters, especially the ResultDocument parameter.
In this part of the tutorial I am going to show how you can redirect users to a custom page upon successful PeopleSoft login. This change will add an intermediate step to the delivered PeopleSoft authentication process flow. The flow of how a user gets into the system will go from this:
Login Page -> Home Page
To this:
Login Page -> Custom Page -> Home Page
Adding this intermediate step to the authentication process is a delivered functionality that just needs to be enabled. There needs to be a slight configuration change to the web profile as well as some changes to the Signon PeopleCode in order for this functionality to work.
First, we need to create the custom PeopleSoft page that we want to serve as the intermediate page that will reside in between the login page and the home page. This will be the page that users will be redirected to upon successful PeopleSoft login. This page will be very generic for this part of the tutorial, but it will be expanded on later. A page with some static text and a button will be all that is needed for now.
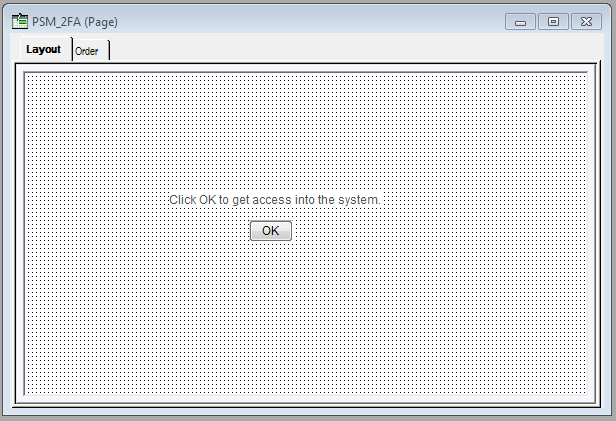
Custom PeopleSoft Page
The only functionality that the page needs to have for now is to be able to write a cookie to the user’s browser and redirect the user to the home page. To achieve this, we will add some PeopleCode behind the button on the FieldEdit event. This code will write a cookie named PSM_2FA_TOKEN and it will redirect the users to the home page when they click the button. We will see why we are writing this cookie when we get into the Signon PeopleCode.
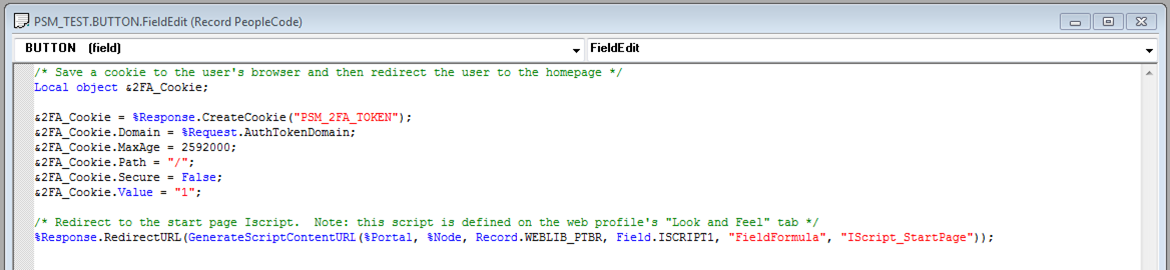
Button FieldEdit PeopleCode
Once this is complete, then all that is needed is to add this page to a component and add the component to a menu. For clarity, I named my page PSM_2FA, my component PSM_2FA, and my menu PSM_CUSTOM. It is important to remember the names of these objects because they will be referenced in the Signon PeopleCode.
Now that the custom page is setup, we need to do the necessary actions to be able to redirect to this page after login. The first thing that we need to do is make a change to the web profile. Specifically, we need to set the Signon Result Doc Page field under the Look and Feel tab of the web profile to signonresultdocredirect.html. Note: once this is completed you need to bounce the web server for the changes on the web profile to work.
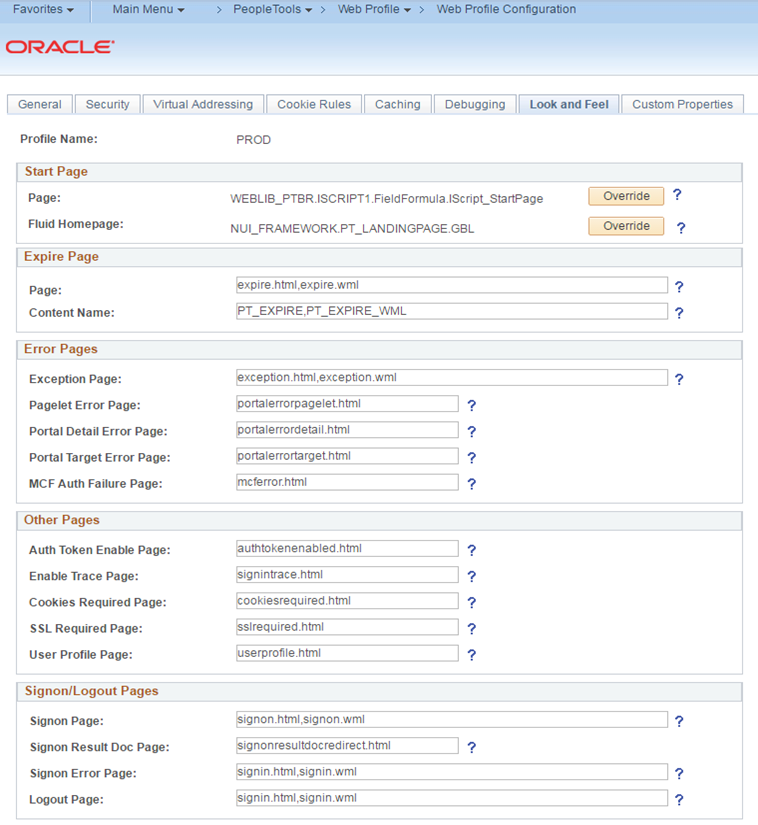
Web Profile Configuration
In this next section of the tutorial, I am modifying existing Signon PeopleCode for demonstration purposes. I do not recommend modifying the delivered Signon PeopleCode as i am doing here. Instead, creating a separate Signon PeopleCode section to house our modifications is a better idea. I outline how to do this in the second part of this tutorial. I am going to modify the existing code for the sake of simplicity in this part.
What we need to do next is determine which Signon PeopleCode functions are being used. To achieve this head over to the navigation: Main Menu -> PeopleTools -> Security -> Security Objects -> Signon PeopleCode. Make note of the functions that have the enabled checkbox checked.
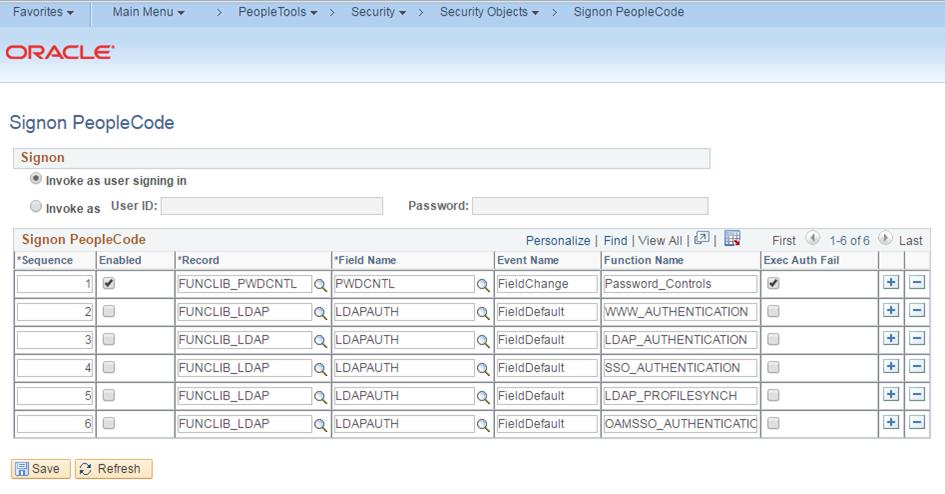
Signon PeopleCode Functions
Lastly, we are going to need to modify all of the enabled Signon PeopleCode functions. Throughout the Signon PeopleCode functions, there are going to be calls to a function named SetAuthenticationResult. What we need to do is modify the call to this function by changing the third parameter in the function call. So the code should go from looking like this:
Delivered Function Call
To this:

Modified Function Call
What this code is doing is populating the ResultDocument parameter and then calling the SetAuthenticationResult with the populated parameter. The ResultDocument parameter either gets populated with a blank string or a string consisting of the URL to the custom page that we previously created.
When the ResultDocument parameter gets populated with a blank string, the user will be taken to one of the following locations based on the given conditions:
Login Page if the &PSAuthResult bool is false
Password Reset Page if the &PSAuthResult bool is true AND the &EXPIRE bool is true
Home Page if the &PSAuthResult bool is true AND the &EXPIRE bool is false AND the user has the PSM_2FA_TOKEN
The ResultDocument parameter only gets populated with the URL to the custom page when the &PSAuthResult bool is true AND the &EXPIRE bool is false AND the user doesn’t have the PSM_2FA_TOKEN.
I’d like to go into more detail of the flow of when we do the redirect process starting from the beginning of the login process.
- The user successfully authenticates themselves with their user id and password
- SetAuthenticationResult function is called
- A PS_TOKEN is issued to the user (the importance of this is explained below)
- The ResultDocument parameter (the URL) is passed to the signonresultdocredirect.html page
- signonresultdocredirect.html redirects the user to provided URL of the custom page
- The user clicks the button on the custom page
- Custom page assigns the PSM_2FA_TOKEN to the user
- Custom page redirects the user to the homepage
When the custom page redirects the user to the homepage the Signon PeopleCode is fired again. This time however, the user will have the PSM_2FA_TOKEN so they will be taken to the homepage. What is going on here essentially is the PSM_2FA_TOKEN is acting as a secondary token to the PS_TOKEN. The user must have both tokens to have full access to the system. In a later part of this tutorial we will not just give out the PSM_2FA_TOKEN with the click of a button as we are currently doing. Instead, we will enforce a second factor of authentication on the user before giving them the PSM_2FA_TOKEN.
Here is the code that was used in this post.
FieldEdit code behind the button:
/* Save a cookie to the user's browser and then redirect the user to the homepage */
Local object &2FA_Cookie;

&2FA_Cookie = %Response.CreateCookie("PSM_2FA_TOKEN");
&2FA_Cookie.Domain = %Request.AuthTokenDomain;
&2FA_Cookie.MaxAge = 2592000;
&2FA_Cookie.Path = "/";
&2FA_Cookie.Secure = False;
&2FA_Cookie.Value = "1";

/* Redirect to the start page Iscript. Note: this script is defined on the web profile's "Look and Feel" tab */
%Response.RedirectURL(GenerateScriptContentURL(%Portal, %Node, Record.WEBLIB_PTBR, Field.ISCRIPT1, "FieldFormula", "IScript_StartPage"));
Delivered Signon PeopleCode SetAuthenticationResult function call:
SetAuthenticationResult(&PSAuthResult, &USERID, "", &EXPIRE, &daysleft);
Modified Signon PeopleCode SetAuthenticationResult function call:
/* Begin 2FA Mod */
If (%PSAuthResult And
%Request.GetCookieValue("PSM_2FA_TOKEN") = "") Then
&URL = GenerateComponentContentURL("EMPLOYEE", "SA", MenuName.PSM_CUSTOM, "GBL", Component.PSM_2FA, "PSM_2FA", "");
Else
&URL = "";
End-If;
SetAuthenticationResult(&PSAuthResult, &USERID, &URL, &EXPIRE, &daysleft);
/* End 2FA Mod */
Comments
sharath
Hi, I am trying to replicate this functionality in HCM PUM20 and I am not being redirected. I followed through the steps and described. Any tips for troubleshooting.? I don’t see the custom cookie being generated.
sharath
here is the screenshot of application data in browser
http://imgur.com/a/34WeW
Colton Fischer
It is possible that the domain that the PSM_2FA_TOKEN cookie is being written for is incorrect. You can look at the PeopleCode that sets the cookie’s domain. I believe that the code is currently referencing the authentication domain that is specified on the web profile. Make sue that the domain that the cookie is being written for is the same domain as the other application cookies such as the PS_TOKEN.
Leave a comment
Your email address will not be published. Required fields are marked *